 |
Using Editors |
< Previous section | Table of Contents | Index | Next section >
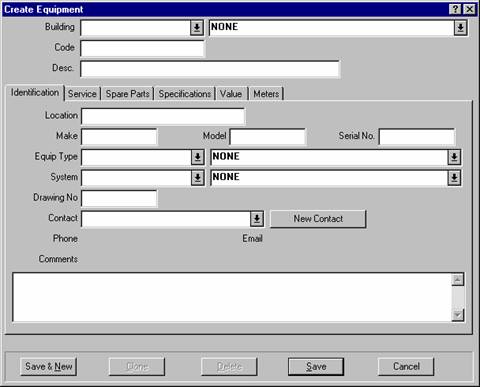
An editor window shows the contents of a single record. For example, here is the editor window for describing a single piece of equipment:

The window consists of a number of information fields. For example, the "Building" field at the top of the window lets you specify the building that contains the equipment.
In the editor window, you can move the cursor from one field to the next by pressing the <Tab> key. For example, if you have just filled in the "Make" field, pressing <Tab> moves the cursor to "Model". In this way, you can <Tab> from one field to the next without having to use the mouse. Of course, you can still use the mouse if you wish. (Note that <Shift+Tab> goes backwards to the previous field; this is useful if you type something, <Tab> out, then notice a typing mistake in the previous field.)
There are several types of information fields. The following explains the most common types of fields, using the Equipment editor window as an example.
Text fields let you use the usual Windows editing features. For example, you can make corrections using <Backspace> or the <Delete> key. You can copy the current selection with <Ctrl+C>, cut the current selection with <Ctrl+X>, and paste in the contents of the clipboard using <Ctrl+V>. You can also use other standard editing features; for more information, see the documentation on your Windows system.
MainBoss gives you a great deal of freedom in how you enter dates and times. For example, here are a number of ways to enter the same date:
December 25, 2001 Dec 25, 2001 2001/12/25 12/25/2001 12/25/01
Times may also be included in the field, either at the beginning or the end, as in
Dec 25, 2001 3:00 pm 3:00 pm Dec 25, 2001 12/25/2001 15:00 15:00 12/25/2001
The examples above show that you can use either a 12-hour or 24-hour clock.
Different parts of the world use different conventions for expressing numeric dates. For example, some use the MMDDYY convention (so that 01/02/03 would be interpreted as January 2, 2003). Other places use the YYMMDD convention (so 01/02/03 would be interpreted as February 3, 2001). Still others use the DDMMYY convention (so 01/02/03 would be interpreted as February 1, 2003). The convention used by your organization can be set by your system administrator using preferences (as described in Date and Time Format and Other Preferences). When in doubt, you can always type in dates using a less ambiguous format. For example, if you type Feb 1, 2003 your meaning will always be clear.

MainBoss displays a set of possible values for the information field. In the case of "Building", this is the set of buildings defined in your MainBoss Buildings table.
If a drop-down list contains a large number of entries, MainBoss displays a scroll bar on the edge of the list, as in:

The arrow buttons in this scroll bar have the same meanings as the arrow buttons in a browser scroll bar. For an explanation of these buttons, see Using Browsers.
To find the desired entry in a long drop-down list, you can click the arrow buttons to move through the list. As an alternative, you can simply start typing the value you want inside the drop-down field. For example, if you type MNO in a drop-down field, MainBoss will drop the list and show you the first list entry that begins with MNO; if there is no such entry, MainBoss will show the first list entry that comes after the string you've typed. Typing a few letters is a quick way to jump down through a long list of possibilities.
| Important: If a drop-down list currently contains a selected value and you want to clear (erase) that value, click on the area where the value is displayed, then type <Ctrl+Delete> (hold down the <Ctrl> key and press <Delete>). MainBoss will drop down the list. Click the mouse anywhere on the window except the drop-down list, and MainBoss will clear the field.
You can also clear a drop-down list selection by right-clicking on the list's arrow and clicking Clear Selection in the resulting menu. |

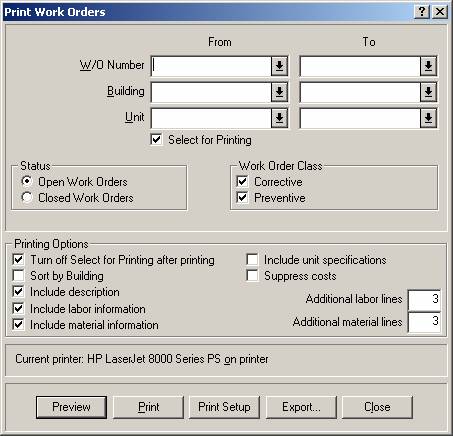
Square option buttons (like the ones under "Printing Options" in the picture) may or may not be arranged in groups. They are used for options that are independent of other options in the window. Checkmarking one of these options does not affect any other options.
In some cases, a square option button has three states: blank, checkmarked, and "not set" (in which case the box contains a grayed-out checkmark). Blank means the option is turned off, checkmarked means the option is turned on, and "not set" means the option follows whatever default is specified in your MainBoss preferences.
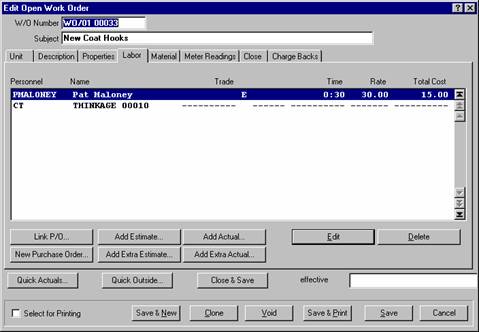
 Buttons in this window (Add Estimate, Add Actual, etc.) let you add new names to the list. The Delete button lets you delete an entry from the list.
The Edit button lets you change an existing entry in the list (for example, changing the time estimate for how long the workers are expected to spend on the job). You can also edit an entry by double-clicking on it with the mouse. Either way, MainBoss will open a window that lets you change the information in the entry.
| Note: As a general rule, double-clicking on any list entry (in either a browser or an editor) lets you edit that entry. |
When you close the editor window for a cloned record, you typically return to the editor window for the original record.
Sometimes when you clone a record, MainBoss asks you what information you want cloned. For more information, see Cloning Records.
See Also:
< Previous section | Table of Contents | Index | Next section >