
|
Using Editors |
This help file applies to an out-of-date version of MainBoss.
The most recent version of MainBoss is MainBoss 4.2.4.
For the latest version of this help file can be found here.
< Previous section | Table of Contents | Index | Next section >
An editor window shows the contents of a single record. For example, here is the editor window for describing a unit (e.g. a piece of equipment):
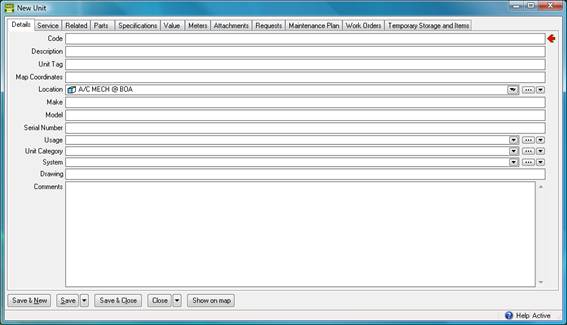
The window consists of a number of information fields. For example, the "Location" field lets you specify where the unit is.
In the editor window, you can often move the cursor from one field to the next by pressing the <Tab> key. For example, if you have just filled in the "Make" field, pressing <Tab> moves the cursor to "Model". In this way, you can <Tab> from one field to the next without having to use the mouse. Of course, you can still use the mouse if you wish.
<Shift+Tab> goes backwards to the previous field. This is useful if you type something, <Tab> out, then notice a typing mistake in the previous field.
<Ctrl+Tab> moves from one section to another in windows that have sections.
Mandatory Fields: Many records have fields that must be filled in before the record can be saved. These mandatory fields are indicated with a red arrow. In the preceding picture, "Code" is a mandatory field, marked with the red arrow.
Once you enter a value for the field, the arrow disappears. When all the red arrows are gone, the record can be saved. If you try to save the record before filling in all the mandatory fields, MainBoss gives you an error message.
Blank Fields: You must fill in the mandatory fields. Other fields may be left blank if you wish. In fact, leaving a field blank is often the best choice—it's better to leave a field blank than to fill it with inappropriate or unnecessary data. As an example, every work request has a "Priority" field that lets you indicate how urgent the work is. However, we suggest that you leave this field blank unless there's good reason to give the request some special priority. Don't feel as if you need to fill in every field.
Types of Fields: There are several types of information fields. The following explains the most common types of fields, using the Unit editor window as an example.
Text fields: Text fields are simplest type of field. In the window above, "Make", "Model" and "Serial Number" are all text fields. To fill these in, just click on the field, then type appropriate values (in this case, the make, model, and serial number of a piece of equipment).
Text fields let you use the usual Windows editing features. For example, you can make corrections using <Backspace> or the <Delete> key. You can copy the current selection with <Ctrl+C>, cut the current selection with <Ctrl+X>, and paste in the contents of the clipboard using <Ctrl+V>. You can also use other standard editing features; for more information, see the documentation on your Windows system.
Comments: Most records have one or more "Comments" fields. This is a catch-all field where you can enter any type of information not covered by other fields.
Read-only fields: A read-only field shows information but the information cannot be changed. For example, suppose you're creating a work request. When you specify the requestor (the person who submitted the request), MainBoss automatically obtains the requestor's phone number and e-mail address from the Contacts table (MainBoss's table of contact information). The phone number and e-mail address are displayed in case you want to contact the requestor, but they're for information only—the request editor won't let you change them.
Read-only fields are easy to distinguish from fields whose contents can be changed. If a field can be changed, its borders are thin black lines. If a field is read-only, it has no borders. In the example below, Requestor can be changed, while Phone is read-only.

Date/time fields: A date/time field lets you record a calendar date and/or time of day. For example, when you write up a work order, you can record information like the date you want the job to start, the date you expect it to end, the date you created the work order, and so on.
Many date/time fields end in a drop-down arrow. Clicking this arrow opens a calendar where you can select the date. This calendar also has a space where you can enter a time on the chosen date.
Drop-down fields: Drop-down fields end in three buttons:

The left-most button (the first arrow) drops down a list of values. This means that MainBoss displays all existing values that can be entered into the field. For example, using this arrow for a "Location" field displays your currently defined locations. You fill in the field by selecting a location from the display.
Alternatively, you can click the middle button (with "..." on it). This opens up a table viewer showing all existing values that can be entered into the field. For example, with a "Location" field, "..." opens a "Location" table viewer. Click the appropriate entry in the table list, then click the Select button. MainBoss will use the chosen record as the value of the original drop-down field. For more about table viewers, see Using Table Viewers.
Alternatively, the right-most button (the second arrow) displays a list of possible actions that you can use to fill in the value of the drop-down field. Typically, the action list includes viewing a list of existing values (which means opening an appropriate table viewer) or creating a new value of an appropriate type. For example, you might see:
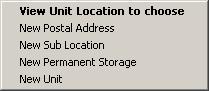
The first action opens the "Locations" table viewer. The other actions let you create new location records of various kinds. If you click one of the options for creating a new record, MainBoss opens a window where you can create that record. Once you save and close this window, the new location you've create will be used as the value of the original drop-down field.
Multi-select drop-down fields: A multi-select drop-down field is similar to a regular drop-down field, but it lets you select more than one value. For example, the window that lets you assign security roles to users lets you specify multiple roles for the user, rather than having to assign one role at a time. A multi-select drop-down field looks like this:

The three buttons work in the same way as in a regular drop-down field. However, when MainBoss offers you a window to choose field values, you can choose multiple values instead of just one. You can specify the values using normal Windows techniques, e.g. dragging the cursor across the values you want, or holding down the <Ctrl> key and then clicking each value separately. Right-clicking in the list of values offers a menu of actions that can help you choose the selections you want.
Option buttons: There are two types of option buttons. The following window shows round options, also known as radio options:
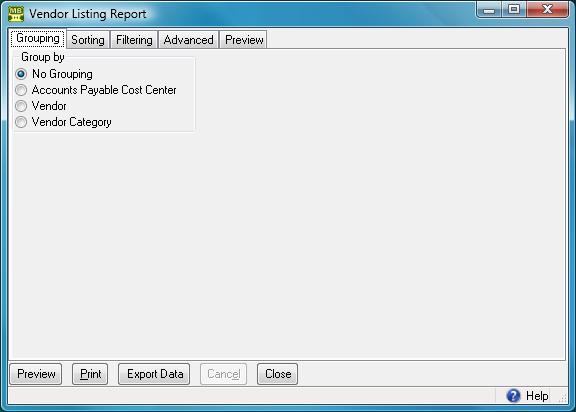 Round option buttons are always arranged in groups. They are used for options that are mutually exclusive—if you select one of the options in the group, it automatically turns off all the other options in the group.
The next picture shows square option buttons, also known as checkboxes:
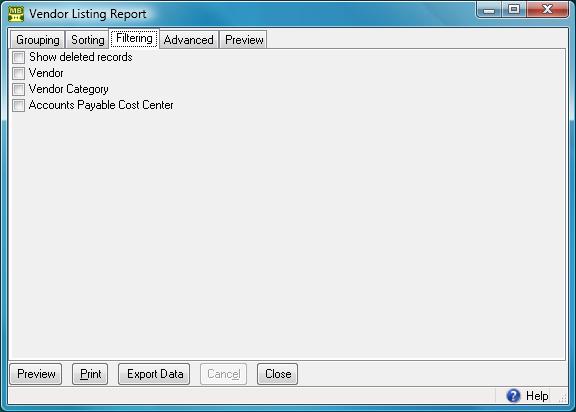 Square option buttons may or may not be arranged in groups. They are used for options that are independent of other options in the window. Checkmarking one of these options does not affect any other options.
Editor buttons: Editor windows may have many different types of buttons, but almost every editor has the following:
Save: Saves the current record. The editor window stays open so you can make more changes to the same record.
Save & New: Saves the current record and sets up the window for you to enter a new record. Fields in the new record will be blank or set to default values.
Save & Close: Saves the current record and closes the editor window.
Cancel: Closes the window without saving any changes you've made to the record since the last time you saved. When you Save the record, the Cancel button changes to Close, indicating that you can safely close the window without losing any changes.
Close: Closes the window. This button only appears after you've saved changes with Save or before you've entered any data at all. Otherwise, the button is labeled Cancel.
List Sections: Many editor windows have sections that contain lists. For example, the window for editing unit record has a section that lists spare parts which are used by the unit.
These lists may have buttons of their own. For example, you might see a New button for adding a new entry to the list or Delete for deleting an entry that's already there. In fact, these lists are like small-scale table viewers: they show records taken from a table and have buttons that let you create, delete, or modify entries in the list.
When an editor window contains this kind of list, the window will have the word Active or All in the lower right hand corner. For more on the meaning of Active and All, see Active and All in Table Viewers.
Fields that can't be changed: Some fields can only be edited at certain times. For example, some fields on a purchase order can't be changed once the purchase order is issued—issuing the purchase order implies that the purchase order is ready to be sent to the supplier, at which point, some information is considered "unchangeable". (Actually, some of this information can be changed, but you have to withdraw the purchase order before you're allowed to make the change.)
MainBoss also prevents you from changing information that has already generated accounting records—for the sake of security, accounting records can't be changed or deleted. For example, when you record the use of materials in connection with a work order, MainBoss generates accounting records indicating the cost of those materials. You can't directly edit this information once the accounting records have been written; if necessary, you must create a correction, which will generate a new accounting record to correct any mistakes in an old one.
See Also:
< Previous section | Table of Contents | Index | Next section >